We probably have all seen videos where either text or the video itself was pulsating to the beat of the music. With VS11/11.5 Plus, and a little work, you can perform this neat effect too. Besides learning how get your text or video to groove to the music, you'll also learn how to use SmartSound Quicktracks, add Text to your project, use Cue Points and the Cue Point Manager, use Audio view, and something else that I'll keep secret for now. This tutorial is aimed for all audiences, so if you're a beginner don't be intimidated, dive right in and hopefully you'll learn quite a bit from this tutorial.
We'll begin by getting some text to groove with the beat. So launch VideoStudio and let's get started!
Text Grooving to the Beat
Select and Add Your Music
Before you begin your project, you'll want to have the music in mind that you are going to use. Of course you'll want something with a good, strong beat, but also keep in mind how long you want the effect to last. SmartSound Quicktracks are great and easy to use for this very purpose!
Click on the Audio tab, and then click on the Auto Music tab. Select Cosmic Tech in the Music Combo Box, Station 3 Variation Combo Box, and 10 seconds for the Duration as shown below.
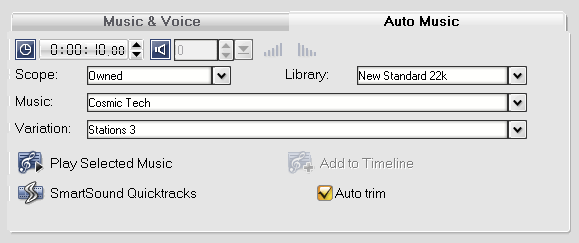
Now listen to our selection by clicking the Play Selected Music icon.
You'll notice that the sound track has a nice, strong beat and that it has a definite beginning and end, which is one of the great benefits of using Quicktracks. If you're already following along, you'll also notice that we can't add this track to our Timeline yet because the option, Add to Timeline, is grayed out.
Deselect the Auto Trim option. Now select , Add to Timeline to add our sound track to the timeline.
FOR BEGINNERS: If you're new to Quicktracks, experiment with the duration. For example, set the duration back to 15 seconds. Now look at how many variations you have for Cosmic Tech. Set the duration to 5 seconds and look at how many variations you now have. Notice the difference? That'll be good to remember when you're doing your own project. It's always useful to first select the music you'll want to use and its length, that way you can hear what suits your taste the best.
TIP: If you'll want to add a transition between your text and the next video clip (which I promise you'll be able to do!), be sure to add a few more seconds to your clip because the transition will cut into your time some.
Now we will want add some text to our Timeline.
Add Text to the Timeline
Select the Title tab and double-click on the Preview window. I'll use (with the default settings),
Wow!
This is cool!
FOR BEGINNERS: You'll notice that as you type in your text that it is not centered on the screen. That's because the cursor begins wherever you double-clicked on the preview screen. Don't worry about this, because you'll see that this is easily fixed in a moment.
When you're done typing in your text, click anywhere outside of the dashed textbox, you'll then notice that the dashed textbox changes as shown below.
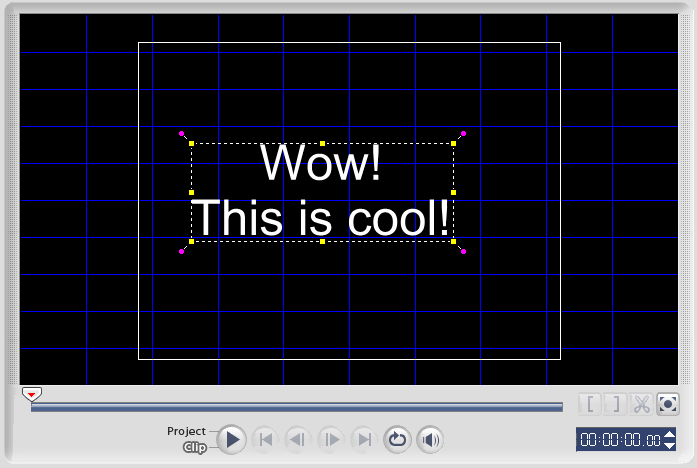
You can click on any of the yellow boxes to easily resize your text. You can also click any of the purple boxes and rotate the text.
FOR BEGINNERS: If you're new to VideoStudio, you'll notice that there is a light gray box in your preview window. This is called the title safe area. What this means is that as long as you keep your text within the bounds of this box, you won't risk text clipping when viewed on a TV screen. Also, you'll need to center your text by click-dragging anywhere within the textbox and dragging the text box to where you want it. You can also use the left and right arrow keys to adjust your textbox alignment.
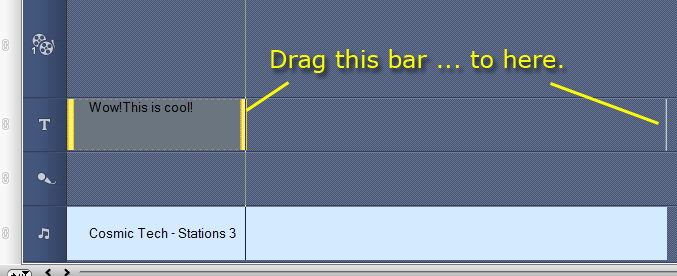
Now, we'll need to extend the length that our text will be viewed since by default it is only about 3 seconds long.
Click-hold the right yellow bar of your title on the Timeline and drag it until it clicks in line with the end of your audio. Pretty neat, eh? Now let's get to work!
Getting into the Groove
Now we need to figure out where the beats are in the music. To do that we are going to use the Audio View on our timeline.
Click on the Audio View icon now.
Next we'll want to zoom in so that we can not only see the beats but more importantly we can accurately add cue points.
Click-drag the zoom bar to about 90% towards the magnifier-plus icon.
You should get a view similar to below. Notice how the Timeline ruler changes.
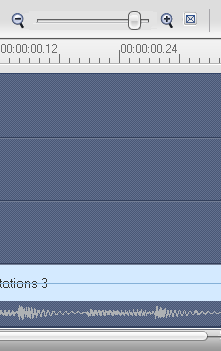
This will give a better view of where the beats are so that you can mark them as a cue point later. For now, let's look at the graphic representation of the music, known as a waveform display as seen above. The waveform is a graph showing the amplitude (loudness) over time of our music, so think of the widest area as a spike in sound level. Now listen to the sound track and watch the wave form. It'll also help to tap your foot along with the beat. You'll notice that the areas where the waveform is the widest are where the bass drum is beating except towards the end of our music where you'll hear a fast snare drum riff. Now let's move on to creating cue points that we will need to use later.
Cue Points
The Chapter Point bar has been updated with some new features in VS11. The new features are an updated interface, Cue Points, Chapter Point Manager, and Cue Point Manager. We are going to be using Cue Points, so
Click on the tiny Chapter/Cue Menu caret that I identified above.
You'll see that we can select Chapter Point (default), Cue Point, Chapter Point Manager, and Cue Point Manager. Since we'll be using cue points,
Click next to Cue Points now.
Once you've listened to your soundtrack while watching the waveform a few times you'll pretty much know where the beats are. If not, listen some more until you feel comfortable. So let's add out first cue point.
On the timeline bar you'll notice a caret icon known as the located on the Timeline ruler. Click-drag the Timeline slider to the first beat and click on the Add/Remove Cue Point icon as shown below. Notice that a blue pyramid was added to the Chapter Point bar. BTW, Chapter Points are represented by an orange pyramid.
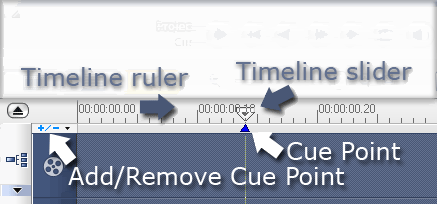
TIP: If you've placed a Cue Point on the wrong frame, you can easily move it by click-dragging the blue pyramid left or right.
Now to continue the process of click-dragging the Timeline slider to the next beat and adding a cue point.
NOTE: You probably noticed that you're not able to exactly line up the beat of the music with each frame in the Timeline. This is because NTSC video uses a finite 30 frames per second (PAL uses 25 frames per second), whereas music has a much wider can range in tempo (speed). But don't worry, thanks to human visual limitations, no one will notice as long as you're within a frame. Listen and watch the cue points and you'll see what I mean.
Now that you've finished adding all the cue points, open the Cue Point Manager by clicking on the Chapter/Cue Menu caret and selecting Cue Point Manager.
NOTE: You'll notice that you have a few options, such as Add, Delete, etc. The only option I'll explain is Go To. Click on a cue point under Time in the left pane. Now click Go To and you'll see that you timeline view to gone to that point. You may find this feature useful in a future project.
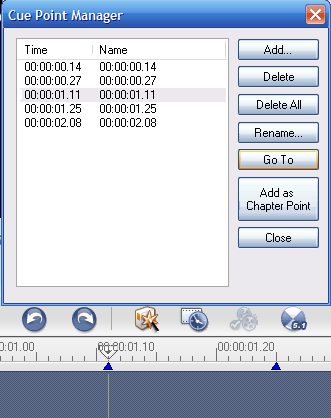
The real purpose of coming to the Cue Point Manager is to write down the time values of our cue points. So grab a piece of paper and write them down. When you're done click Close.
Now that we have our cue points we come to (drum roll, please)........
The Secret Power Tip!
This power tip is the secret that allows us to do things that people think VideoStudio isn't capable of doing. I'm not going to discuss all of the possibilities that this power tip opens up to you here (that'll be another tutorial). But for our tutorial, it's going to allow us to apply a video filter to our text. So what is it? Here it is in three easy steps:
1. Save your project with the name \"text_pre.vsp\". I use _pre for pre-filter.
2. Open a new project (CTRL-N).
3. Select File -> Insert Media File to Timeline -> Insert Video, select your just saved project (you may have to navigate to the directory where you saved it), and select Open.
That's it? Yep, that's it!
Now there is another way that allows us to apply a video filter to text, and that's by rendering, or creating a video file. However, we'll have to wait for the file to render. Plus we want to be able to easily edit the text without having to render each and everytime we change it. Additionally, we'll same some disc space for more important stuff! So let's move on to applying our video filter to our text. Now we start the real work!
Creating the Pulses
Go to the Video Filter library.
FOR BEGINNERS: Get to the Video Filter library by clicking on Video Combo Box as shown below.
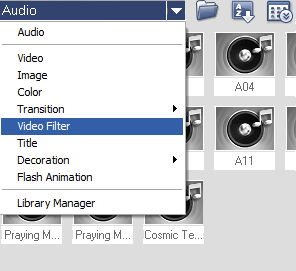
Scroll down to the Video Pan and Zoom filter and click-drag it onto your text video on the timeline.
Select Customize Filter.
Now to do our pulsing effect, we'll use \"key frames\" to mark where we want our pulses to be. Remember that list of cue points that you wrote down? This is where we'll use it. Before we begin, let's first zero-out the default filter settings. But first let's look at those now. You'll notice that the first key frame is already highlighted (it is red). You'll see that Zoom ratio is set to 112% and that Transparency is set to 0%. Now look in the filter preview window. You'll notice that there's a dashed box with small yellow boxes on each corner. This is another way to control zoom. Also notice the small red crosshair. This shows where the Video Pan and Zoom filter is centered for the current key frame. By the way, the gray crosshair is the crosshair for the last key frame.
Now click on the diamond for the last key frame, or alternatively click on the gray crosshair in the preview screen to jump to the last key frame. You'll see that Zoom ratio is set to 146% and that Transparency is set to 0%. You'll also notice that the red crosshair is now highlighted on this key frames center. This is what creates the Ken Burn's panning motion. You change adjust the keyframe's center by simply click-dragging. So let's now zero-out these settings.
Click back on the first key frame's diamond.
Change the Zoom ratio from 112% to 100%.
Right-click on the first key frame diamond and select Copy and Paste to All.
Now let's start adding key frames. First slide the Zoom control all the way to the right. This will allow us to see every frame easily. Before we begin, however; let's think about the effect that we want to create, which is a feeling that the text is grooving to the music. So what we want to do here is have a quick pulse, or heartbeat effect, on each beat. To accomplish this we'll need three key frames for each beat. This will give us an anchor zoom of 100% (which is really no zoom at all) just before the beat, a quick zoom on the \"beat' key frame, and then go back to no zoom immediately after each beat.
FOR BEGINNERS: What would happen if we didn't use a key frame just before and after our \"beat\" key frame? Well, from the first key frame to our first \"beat\" key frame (which for me is frame 14), the filter would take 14 frames to gradually come to the new zoom ratio. Therefore we wouldn't get that sudden, heart-thumping pulse.
1. So on the Timeline ruler , click-drag the Timeline slider to the frame before the first beat. Since the first beat is frame 14, slide to frame 13.
2. Click on the Add key frame icon.
3. Click on the tick that represents the next frame on the Timeline ruler.
4. Repeat steps 2 and 3 to add the next two key frames in this group.
5. Click on the \"beat\" key frame and change the Zoom ratio to 150% as shown below.
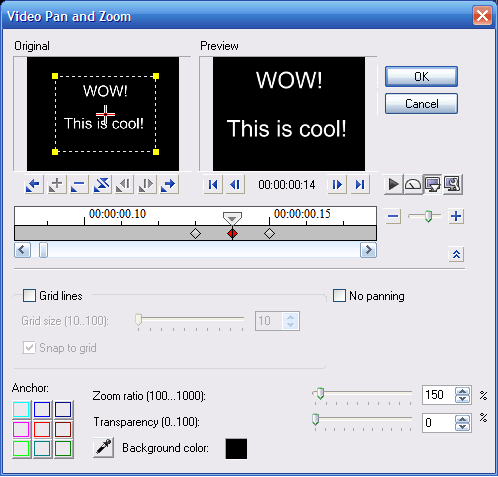
NOTE: You may wonder why we didn't go ahead and change the Zoom ratio when we added the \"beat\" key frame, this is because the Zoom ratio would have stayed the same when we added our next key frame adding yet another step. This effect is enough work as it is!
Now go back to step 1 and repeat until all of your key frames have been entered. Click OK when you're done.
That's it, you're done! Press CTRL-S and name your project \"text_post.vsp\". I chose _post for post-filter.
Now when you're ready to use this in any project, open your text_pre.vsp project and change the text to your liking. Save your work, and then open (CTRL-O) your text_post.vsp file. Now you can render the file to the same output as your current project, for example NTSC DVD(4:3, Dolby Digital 5.1). The only time that you'll have to do all the work of adding key frames is if you want to change your music or the length. Actually, changing the length will be a little easier since you'll already have key frames set up.
Video Grooving to the Beat
To use video instead of text, simply follow the same directions for Select and Add Music, select a video file and add it to your timeline, and then follow the directions for Creating the Pulses.
The videos used in the Sample project (included with VS11/11.5 Plus) are good to use for experimenting. They are located at
C:\\Program Files\\Ulead Systems\\Ulead VideoStudio 11\\Samples\\Video
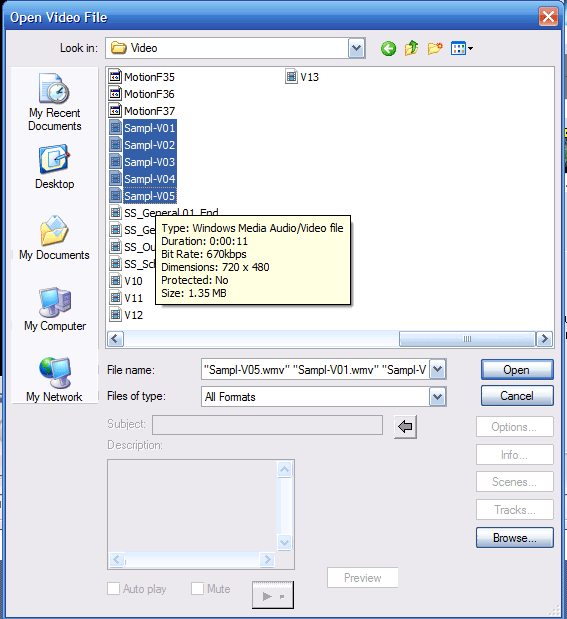
Click on the Load Video icon, which looks like an open folder, to import videos \"Sampl-V01\" through \"Sampl-V05\" into your library.
TIP: A quick way to import the 5 video at once is to click on the first video, then while holding down on the SHIFT key, select the last video as seen below. Then Click Open.
I'd suggest using a smaller Zoom ratio , something around 125%. Also, as a creative idea, add a different filter. First make sure that the Replace last filter checkbox is deselected.
For example, with the Color Balance filter change colors every four beats. You'll be glad to know that you only need to use one key frame per every 4 beats!
Creative Ideas
- Use this effect between videos clips in a project.
- If you want to use this effect with text as an overlay you can. Just use insert the rendered text onto an Overlay track, use Mask & Chroma Key, and set your Similarity to 0. Note that this will produce a slight change to the look of the text, but it still will be the same effect.
- Try using a different effect, or combination of effects, on your text. For example, use my power tip (without the music and pulsing effect) to create \"Happy Halloween\" and experiment with the Ghost Motion filter to create a ghostly effect. Maybe add the introduction of \"Thriller,\" you know the cool part with Vincent Price. Mwah-ha-ha-ha-ha.
Well, I hope you've at least learned something from this tutorial. I tried to keep a balance between beginners and more advanced users, which is very hard to do in a tutorial and with the formatting limits in the forum's software! These may just get me to register an URL yet and create a tutorial site. Anyway, I digress; the concepts you've learned here can be applied in other projects, such as using filters, using cue points, or even just using SmartSound Quicktracks. I hope you enjoyed it!
Have fun and be creative!
Ronald Guthrie