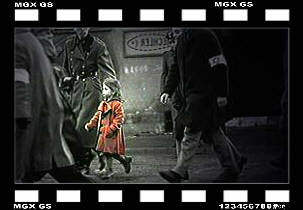
What I shall be doing here is creating a scene in black and white but with a moving object in full glorious colour - What you may find surprising is that I will ONLY be using Corels products VideoStudio 11+ and PhotoImpactX3.
Although this might seem a time-consuming exercise you should take into account that you are only likely to use this method for a few seconds at a time. Because we are dealing with moving images you do not need to be as accurate as you are when dealing with a single still image. Therefore the process does not take as long as you might first expect.
If you are part of a production company doing this for profit then you can give this routine to a member of your team who can spend a bit more time perfecting the outline of the coloured area(s) whilst other members of your team work on other parts of your production.
If you are an individual piecing together a home video then you need not be so accurate - the end result will still impress your friends and family.
To demonstrate this technique I am using a sample Video supplied with VideoStudio 9 - Sampl-V07.mpgAlbert Einstein wrote:Genius is 5% inspiration and 95% perspiration.
Step 1.
Create a folder on your hard drive to hold all of the extracted images.
Step 2.
Open VideoStudio and place the video on the time line.

Step 3.
To generate individual picture frames you now create a video sequence file. To do this go to the share tab

Create Video File - Custom.

Select Ulead Image Sequence Files

Select Options then make sure you have selected RGB 24 bit True Colour BMP format.

Select FRAME based

If you now open your folder where you saved the image sequence file to then you will see each individual frame has now been saved as an image.

You can now close VideoStudio.
Step 4.
Open PhotoImpact and select Browse from the tool bar menu.

Navigate to the folder containing your image files

Right click an image then "Select all"

Then "Open"

Step 5.
Now we process each image one at a time. The procedure for each one is the same and so obviously I shall only do the first one here in this tutorial.
The amount of time and effort you put into this will determine the quality of your final completed video. Because the images are flashing before our eyes at (PAL) 25 frames per second you need not be too accurate.
Step 5 a.
From the tool bar select Object / Extract Object

Step 5 b.
Outline the area that you want to keep in colour.

Step 5 c.
Click the [Next] button and then click on the picture OUTSIDE the area you want to keep.

Step 5 d.
Click [Next]

If you are happy with the extracted area click [OK] of to alter the extracted area click [Back] - remember there is no need to be too accurate because we are dealing with moving images not stills.
Step 6

From the layer manager hide the extracted Image and select the base image.

Step 7.
From the tool bar select Photo / Colour / Hue & Saturation

Step 8.
Move the saturation level to minus 100 (extreme left)

Click the OK button to return to the editor


Step 9.
"Show" the hidden top layer

Step 10.
Merge the objects

Step 11.
Close the image and save the changes.


Step 12.
Repeat the above process from Step 5a to here until all of the images have been processed. Now close PhotoImpact.
Step 13.
Open VideoStudio and then right click on the time line and select "Insert Video"

Navigate to the folder containing your Video Sequence file and select it

Step 14.
Preview your video and either render it or add it to your main movie.