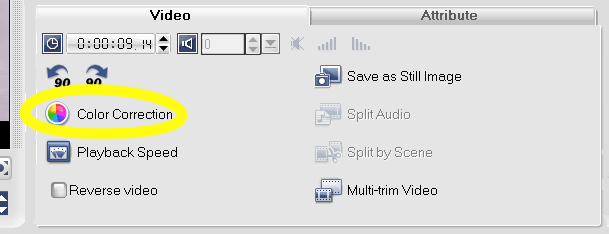
Ulead's VideoStudio 11and 11.5 Plus have two new powerful video filters, Auto Color and Tone. The filters are designed, respectively, to improve the white balance and tonal quality of your video. If you saw these filters mentioned at Ulead's website describing VideoStudio's features, then you were probably excited like me, as we always can use something that will improve the quality of our some of our raw video. Now you may be asking, \"If these filters are automatic, why do I need to read this tutorial\"? Well, good question. Ulead has not only made these filters automatic by default, but they have given us the power to fine-tune the filters. And some of the features will benefit from explanation. These filters aren't found in the filter library, however; they are located in the Color Correction option under edit mode as seen below. Also, I'll refer to these filters as White balance and Auto Tone Adjustment from now on because that's how they are presented in Video Studio.
Before we begin our learning about Auto Color and Tone, let's look at our Color Correction options prior to version 11. Below (in version 10 Plus), we can see that our options were Hue, Saturation, Brightness, Contrast, and Gamma.
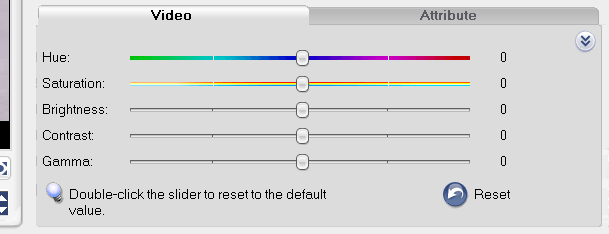
While very useful, these controls would take a lot of experimentation to produce desirable results (plus fine tuning was difficult at best). I personally didn't use them because I didn't have that much patience. However, the new filters, to say the least, are a very welcome addition to our editing arsenal and are definitely worth using. Let's begin with White balance by looking at our new Color Correction tab.
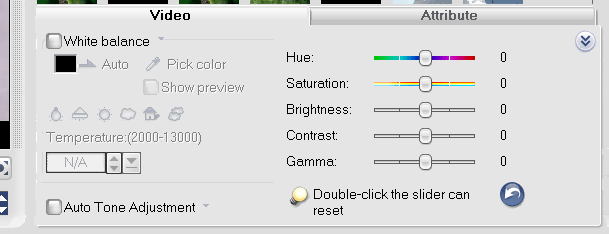
NOTE: If you'd like to follow along with this tutorial, I recommend using one of the sample videos used with the sample project that came with VS11, as it has a color cast problem. I'll be using the following video:
C:\\Program Files\\Ulead Systems\\Ulead VideoStudio 11\\Samples\\Video\\Sampl-V03.wmv
White balance
The White balance filter can remove any unnatural color casts caused by lighting problems when you recorded your video. When you select the checkbox for White balance you'll see an almost immediate difference as shown below.
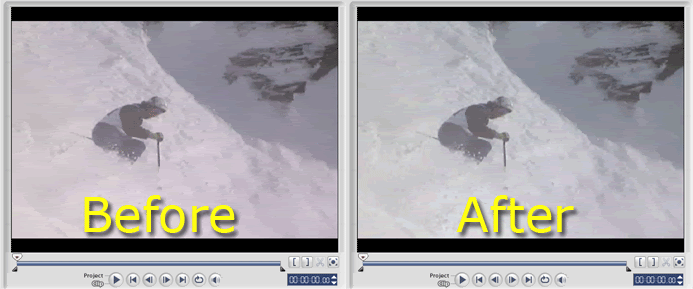
Pretty awesome, eh? Now, let's look at our other options. If you look right next to the word White balance you'll notice a small caret (something else new in VideoStudio). If you click on this, you see the following options and their defaults.
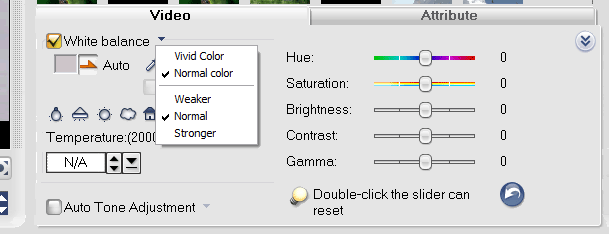
If you select Vivid Color, you'll see a noticeable difference in the filter's effect. Now select Normal color and experiment with the bottom three choices. You'll notice just minute differences in the effect now. Experiment further by selecting Vivid Color again.
Another choice we have is the Pick color eyedropper. To use this tool, click on the eyedropper icon and select the whitest spot on the preview video. If you're using the same video as me, select the shiny spot on the skier's helmet. When using this tool, you'll actually have to click twice on this spot since you're video has already been balanced automatically. You'll notice that this result is very, very close to the Auto feature of this filter.
Now let's move to yet another way to affect the white balance of our video by the using the icons as shown below.
As you select these various icons you'll notice some dramatic changes in the white balance of your video in the preview window. You'll also notice that the number under Temperature:(2000-13000) changes as well. To understand these icons better and what the numbers mean, let me digress for a short while into color temperature and Kelvins.
Color temperature describes the spectrum of light which is radiated from a \"blackbody\" with that surface temperature. A blackbody is an object which absorbs all incident light-- neither reflecting it nor allowing it to pass through. A rough analogue of blackbody radiation in our day to day experience might be in heating a metal or stone: these are said to become \"red hot\" when they attain one temperature, and then \"white hot\" for even higher temperatures (Understanding White Balance, accessed April 16, 2008).
Basically, in a nut-shell, the higher the number in kelvins, the \"cooler\", or bluer, the color temperature will appear; the lower the number is in kelvins, the \"warmer\", or orangey, the color temperature will appear. So let's look at our icons and their corresponding number again.
Tungsten - 2800
Fluorescent - 3800
Daylight - 5500
Coudy - 6500
Shade - 7500
Overcast - 13000
Intuitively, you may think, well I recorded this footage under fluorescent lighting, so I'll just click on the fluorescent icon. Well, this isn't the case here. Remember, we are using a filter to negate the color cast on our video. So if a video is too blue, we need to apply an orange filter, and conversely, if our video is too orangey, then we need to apply a blue filter. Experiment with this in mind and the icons will become more intuitive. Our final choice is to actually choose a number in the text box below Temperature:(2000-13000). Play around with this as see the different results you can get. For a creative idea, try 2000!
One final note before we move onto Auto Tone Adjustment. You'll notice that we still have access to Hue, Saturation, Brightness, Contrast, and Gamma. Just note that adjusting these will alter any White balance and Auto Tone Adjustment that you've made. So, let's move onto Auto Tone Adjustment.
Auto Tone Adjustment
The Auto Tone Adjustment filter is practically a fully automatic filter. If you click on the checkbox you'll notice that the video get a tonal quality makeover. I'll take a stab in the dark here and say that this filter probably adjusts the brightness, contrast, and gamma altogether of your video. While the Auto Tone Adjustment filter doesn't have as many options as White balance, it's still a very powerful filter. Look at the options by clicking on the small caret to the right of Auto Tone Adjustment. We can see our choices are Brightest, Brighter, Normal, Darker, and Darkest.
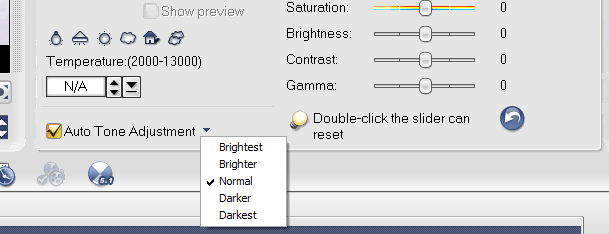
Experiment with these choices. For some fun, change the White balance Temperature to 2000 and then experiment with the Auto Tone Adjustment choices.
Well, this wraps up my tutorial on two great new filters that we now have in VideoStudio. I hope you enjoyed learning about these filters and that you'll start using them in your future projects.
Enjoy, and be creative!
Ronald Guthrie